MVVM Android
MVVM stands for Model-View-ViewModel, and it is a design pattern used in Android app development to separate the user interface (UI) logic from the business logic and data handling.
MVVM is one of the most popular architectural patterns for building modern Android applications, as it promotes separation of concerns and enables efficient development and maintenance of code.
Components of MVVM
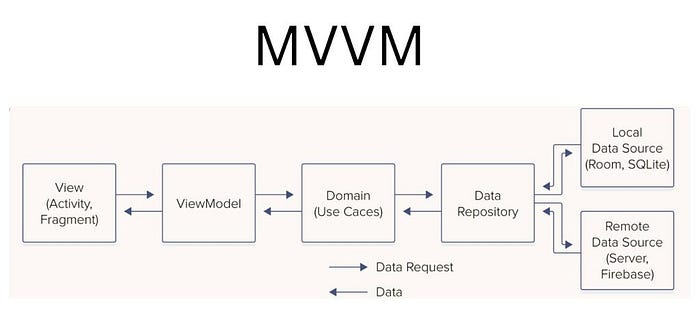
- Model: The Model represents the data and business logic of the app. It could be data classes, databases, network APIs, or repositories that handle data fetching and storage.
- View: The View represents the user interface of the app. It includes XML layout files that define the visual components, such as TextViews, Buttons, RecyclerViews, etc. The View is responsible for rendering the UI and receiving user input events.
- ViewModel: The ViewModel acts as an intermediary between the Model and the View. It holds the data that needs to be displayed in the View and exposes methods and commands that the View can bind to. It also communicates with the Model to fetch or update data. The ViewModel does not have a direct reference to the View, which makes it agnostic to the UI framework.
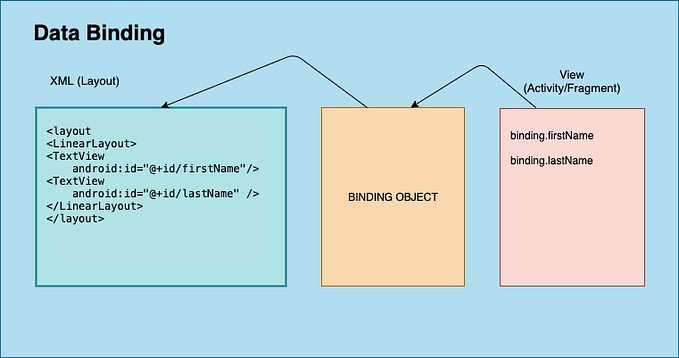
The MVVM pattern promotes data binding, where the View and ViewModel are connected through data binding expressions, allowing automatic updates of the UI when data changes in the ViewModel. This reduces the need for manual UI updates and improves the separation of concerns between the UI and business logic.
Benefits of using MVVM
- Separation of concerns: MVVM promotes a clear separation of concerns between the UI logic, business logic, and data handling, making the codebase more maintainable, testable, and scalable.
- Improved testability: MVVM allows for easy unit testing of the ViewModel, as it does not have a direct dependency on the View. This makes it easier to write unit tests for the business logic of the app.
- Flexibility: MVVM provides flexibility in UI design and allows for easier adaptation to changes in UI requirements or data sources, without affecting the business logic.
- Code reusability: MVVM enables the reuse of ViewModels, as they are independent of the View and can be used with different UI components, such as Fragments, Activities, or even in multiple screens of an app.
In conclusion, MVVM is a popular architectural pattern used in Android app development that promotes separation of concerns, improves testability, provides flexibility, and enhances code reusability. It is widely adopted by many Android developers for building modern and scalable applications.
MVVM vs MVP
MVVM (Model-View-ViewModel) and MVP (Model-View-Presenter) are both popular architectural patterns used in Android app development, but they have some differences:
- Data Binding: MVVM makes extensive use of data binding, which allows for seamless binding of UI components to the ViewModel properties, automatically updating the UI when the data changes. MVP typically does not involve data binding.
- ViewModel: In MVVM, the ViewModel is responsible for holding the data and business logic related to the View, and it is lifecycle-aware, meaning it can survive configuration changes. In MVP, the Presenter is responsible for managing the View’s state and updating the UI.
- Separation of Concerns: MVVM emphasizes a clear separation of concerns, where the View is only responsible for UI rendering, the ViewModel manages the data and logic, and the Model represents the data and business logic. MVP also separates concerns, but the Presenter typically acts as an intermediary between the View and the Model, making the View more tightly coupled to the Presenter compared to MVVM.
- Testability: Both MVVM and MVP promote testability, but MVVM is considered to be more testable due to its separation of concerns and the use of data binding. In MVVM, unit testing the ViewModel can be done independently of the UI, while in MVP, testing the Presenter often requires mocking the View interface.
- Flexibility: MVVM is highly flexible and can be used with various UI frameworks and data sources. It is not tied to a specific UI technology. On the other hand, MVP is typically associated with traditional Android UI frameworks like Activities and Fragments, and the View-Presenter relationship can sometimes become complex in larger projects.
- Learning Curve: MVVM may have a steeper learning curve initially due to the concepts of data binding and lifecycle-awareness, but it can provide more maintainable and scalable code in the long run. MVP may be easier to understand and implement for developers who are already familiar with the traditional Android development approach.
Ultimately, the choice between MVVM and MVP depends on the specific requirements and constraints of your project, your team’s familiarity with the patterns, and your personal preferences. Both MVVM and MVP can be used effectively to build well-structured, maintainable, and testable Android apps.
Basic Implementation of MVVM:
- Create the Model: The Model represents the data and business logic of your application. It can be in the form of data classes, POJOs, or data sources such as APIs or databases.
data class User(val id: Int, val name: String, val age: Int)2. Create the View: The View is responsible for rendering the UI and displaying data to the user. It can be in the form of activities, fragments, or custom views.
class MainActivity : AppCompatActivity() {
    // Views
    private lateinit var nameTextView: TextView
    private lateinit var ageTextView: TextView

    // ViewModel
    private lateinit var viewModel: UserViewModel

    override fun onCreate(savedInstanceState: Bundle?) {
        super.onCreate(savedInstanceState)
        setContentView(R.layout.activity_main)

        // Initialize views
        nameTextView = findViewById(R.id.nameTextView)
        ageTextView = findViewById(R.id.ageTextView)

        // Initialize ViewModel
        viewModel = UserViewModel()

        // Observe LiveData from ViewModel
        viewModel.userLiveData.observe(this, Observer { user ->
            // Update UI with user data
            nameTextView.text = user?.name
            ageTextView.text = user?.age.toString()
        })

        // Load initial data
        viewModel.loadUser()
    }
}
3. Create the ViewModel: The ViewModel acts as an intermediary between the Model and the View. It contains the logic for fetching data, processing data, and exposing data to the View. It uses LiveData to notify the View of data changes.
class UserViewModel : ViewModel() {
    // LiveData for holding user data
    val userLiveData: MutableLiveData<User> = MutableLiveData()

    // Load user data
    fun loadUser() {
        // Fetch user data from Model (e.g., API, database)
        val user = User(1, "John", 25)

        // Update LiveData with user data
        userLiveData.value = user
    }
}
4. Bind View to ViewModel: In the View, we bind the UI components to the ViewModel using data binding or by calling ViewModel methods directly.
<!-- activity_main.xml -->
<layout xmlns:android="http://schemas.android.com/apk/res/android">
    <data>
        <variable
            name="viewModel"
            type="com.example.myapp.UserViewModel" />
    </data>

    <!-- UI components -->
    <TextView
        android:id="@+id/nameTextView"
        android:text="@{viewModel.userLiveData.name}" />
    <TextView
        android:id="@+id/ageTextView"
        android:text="@{viewModel.userLiveData.age}" />
</layout>
5. Add Gradle dependencies: Make sure to add the necessary dependencies for ViewModel and LiveData in your app’s build.gradle file.
dependencies {
    // ViewModel and LiveData
    implementation 'androidx.lifecycle:lifecycle-viewmodel-ktx:2.3.1'
    implementation 'androidx.lifecycle:lifecycle-livedata-ktx:2.3.1'
}
